

How to Hang Artwork on Walls with Neodymium Magnets
Magnets are an excellent way to hang and display your prints, posters, photography and other artwork.
But which magnets do you need? How many will be required? Where should you put them? This article will help you begin to answer these questions to display your art brilliantly, boldly and beautifully.
 Hanging Lightweight Prints, Photos, and Posters
- Determine where you want your artwork to sit on the wall.
- Lightly mark the wall with a pencil where your artwork will attach, ideally just to the inside of all four corners.
- Take a hammer and tap a flat head ferromagnetic steel nail or thumbtack into the wall at each of the pencil-marked attachment points. Remember, not all stainless steel nails are ferromagnetic, so be sure to use nails or thumbtacks that attract magnets.
You can also use self-adhesive steel discs if you don't want to put a hole in the wall. We recommend the 3/8 inch or 1/2 inch disc size depending on the size of your artwork piece. Self-adhesive steel discs need 24 hours for the glue to cure or set up before you should put pressure on them.
- Place your artwork over the four nails or steel discs that you have attached to the wall, and then attach a small discmagnet over the top of your artwork at each of these points.
Depending upon the size, span and weight of your artwork, you may want to try 3/16 x 1/8 Inch Neodymium Disc Magnets, or even a larger size such as 1/4 x 1/8 Inch Neodymium Disc Magnets for bigger pieces.
- It your artwork stays attached and secure, you’re good to go! If your piece isn't staying attached, you may need stronger magnets to hold it up. Or, you may want to add several more attachment points, possibly equidistant between the corners.
Hanging Heavier Framed Artwork
 This can be more of a trial-and-error process compared to hanging lighter pieces. Finding the right magnets may take several attempts.
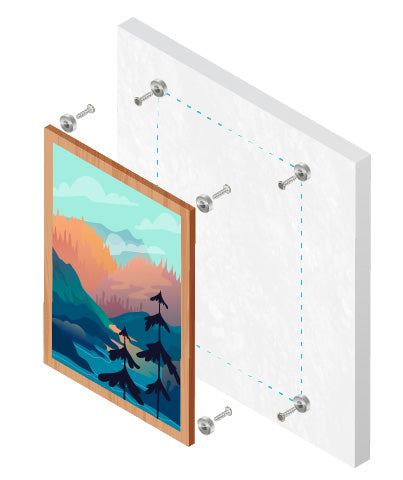
- Decide where you want your framed pieces to sit on the wall and mark the wall and frame at all of the attachment points. This would normally be inside of the four corners of the frame, but could include other attachment points between the corners.
-
For lighter artwork under 5lbs, 1/2 x 1/8 Inch Neodymium Countersunk Disc Magnets or 5/8 x 1/8 Inch Neodymium Countersunk Disc Magnets may work.
-
For medium to heavier pieces up to 12lbs, you will want to try stronger magnets such as the 3/4 x 1/8 Inch Neodymium Countersunk Disc Magnets or the 1 x 1/8 Inch Neodymium Countersunk Disc Magnets.
- Screw either the north or south countersunk magnets into the wall at each attachment point. We recommend using drywall anchors if you are unable to screw into a stud.
- Screw the opposite-polarity of the wall magnets into the attachment points on the back of the frame. Our north countersunk magnets are generally marked with a red line or dot to help you differentiate between the polarity of each countersunk magnet.
Remember N attracts S and vice versa, whereas N to N and S to S facing magnets always repel. This is why all countersunk magnets are sold as paired.
- Place the artwork on the wall at these attachment points. Continue to hold the artwork to see if it will stick and hold securely to the magnets/strike plates on the wall. Keep one hand underneath your frame to make sure it sticks securely and doesn’t drop to the floor.
If your artwork does not stay securely attached to the wall and slips downward, you know that you will need more attachment points and very possibly stronger magnets as well.
We recommend sliding the artwork off of the wall laterally rather than pulling it straight off of the wall when you need to change it out. This will allow you to more easily remove your artwork without damaging your piece or points of attachment.
Working With North/South Countersunk Magnets
When screwing countersunk magnets into your wall and frame, you will need paired countersunk magnets, which you will screw into the wall and into the back of the frame or artwork you are hanging. These magnets normally come in matching north and south pairs, and you will screw them in so that the outside surfaces are paired north and south facing each other, so they attract each other. The north countersunk magnets are generally marked with a red line or dot.
Trial and Error Process
It is important to remember that finding the appropriate magnet-to-magnet or magnet-to-strike plate combination may involve a trial and error process. In addition, you can experiment with how many areas of attachment you want to create, from the four corners of the artwork, to perhaps also placing magnets equidistant between the corners.
Magnet Placement
In most cases, using enough magnets so that the corners and edges don't wave around will suffice. For example, an 8 x 10 print may only require magnets at the corners. For larger signs and posters, you may want to attach additional magnets equidistant between the corners.
Need more help with your project?
You can always get in touch with our magnet experts if you have any questions or want assistance selecting the right magnets for your art project.